

Dog ear cleaning is the practice of safely removing dirt, wax, and moisture from a dog’s ear canal and outer ear to maintain ear health and prevent infections. Most ear infections in dogs are preventable with a consistent cleaning routine and the right technique. Veterinary standards in 2026 emphasize gentle, pH-balanced solutions and Fear-Free handling as the foundation of safe ear care at home. Skipping this routine, especially for floppy-eared breeds or dogs who swim often, creates the warm, moist conditions that bacteria and yeast thrive in. The good news is that with the right supplies and a calm approach, you can do this safely and confidently at home.
What supplies do you need for dog ear cleaning?
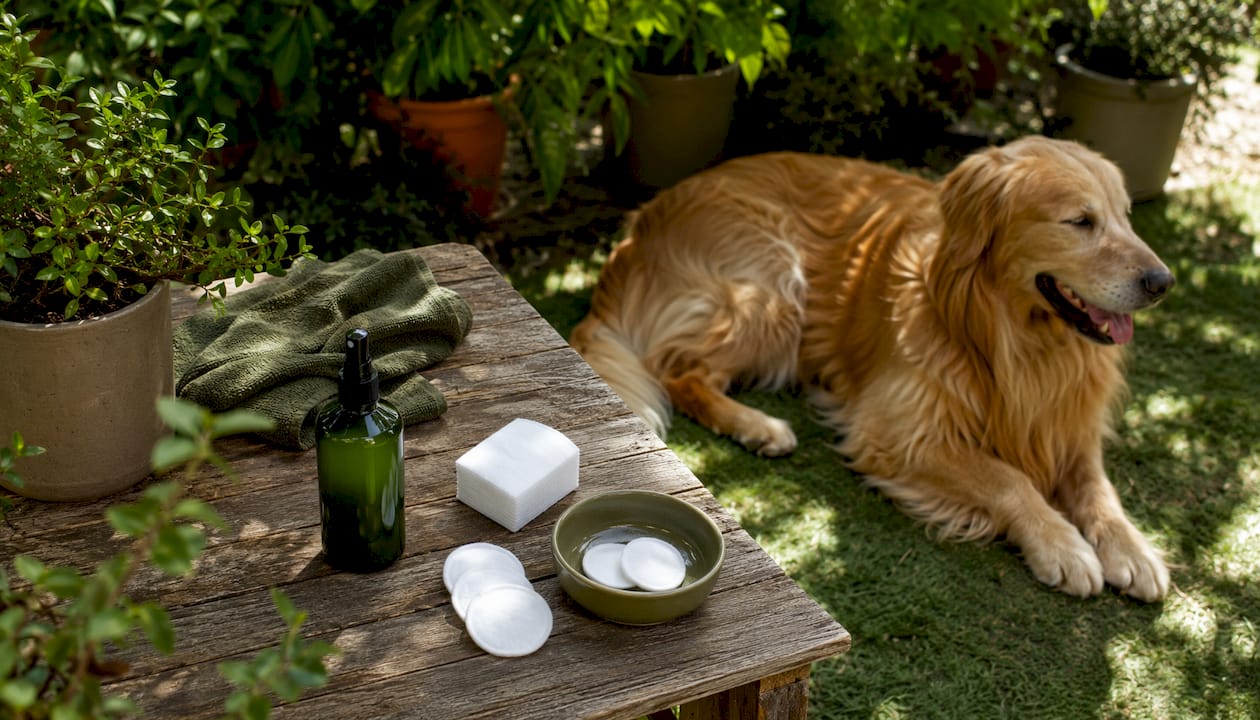
The right supplies make the difference between a safe cleaning session and an accidental injury. You need a vet-approved ear cleaning solution, cotton balls or gauze pads, a clean towel, and high-value treats. That short list covers everything required for a thorough, safe clean.
What to gather before you start:
- Vet-approved ear cleaner. Choose a product that maintains pH balance and controls moisture. Maintenance formulas often contain lactic or salicylic acid. Medicated products with ketoconazole or chlorhexidine require a veterinary prescription.
- Cotton balls or gauze pads. These are safe for wiping the outer canal. They absorb debris without pushing it deeper.
- A clean towel. Place it under your dog or use it to catch any solution that drips after your dog shakes.
- High-value treats. Freeze-dried treats work well here because they are small, quick to eat, and easy to handle with one hand.
Three products you must never use: hydrogen peroxide, alcohol, and cotton swabs. Hydrogen peroxide and alcohol cause chemical burns inside the ear canal. Cotton swabs push debris deeper and risk puncturing the eardrum.
Pro Tip: Warm the ear cleaning solution by holding the bottle in your hands for 30–60 seconds before use. Warm solution reduces the startle reflex and makes the experience far more comfortable for your dog.
Choose a quiet room with good lighting. Lay a non-slip mat on the floor so your dog feels stable. A calm environment sets the tone for the whole session.
How often should you clean your dog’s ears?
Cleaning frequency depends on your dog’s breed, ear shape, and lifestyle. Over-cleaning strips the ear of natural oils and disrupts the protective environment. Under-cleaning allows wax and moisture to accumulate, which invites infection.
Veterinary guidelines recommend the following schedule:
| Dog type | Recommended frequency |
|---|---|
| Most dogs with upright ears | Once a month |
| Floppy-eared breeds (Basset Hound, Cocker Spaniel) | Every 1–2 weeks |
| After swimming or bathing | Immediately after water exposure |
| Dogs with current ear infection | Only under veterinary direction |
Floppy ears trap moisture and restrict airflow, which is why breeds like Cocker Spaniels and Basset Hounds need more frequent attention. Dogs who swim regularly face the same risk because water sits in the canal long after they leave the water.
Watch your dog’s individual pattern. Some dogs naturally produce more wax than others. If your dog’s ears look clean and smell fine at the monthly check, you do not need to clean them. Cleaning ears that do not need it causes more harm than skipping a session.
How do you clean your dog’s ears step by step?
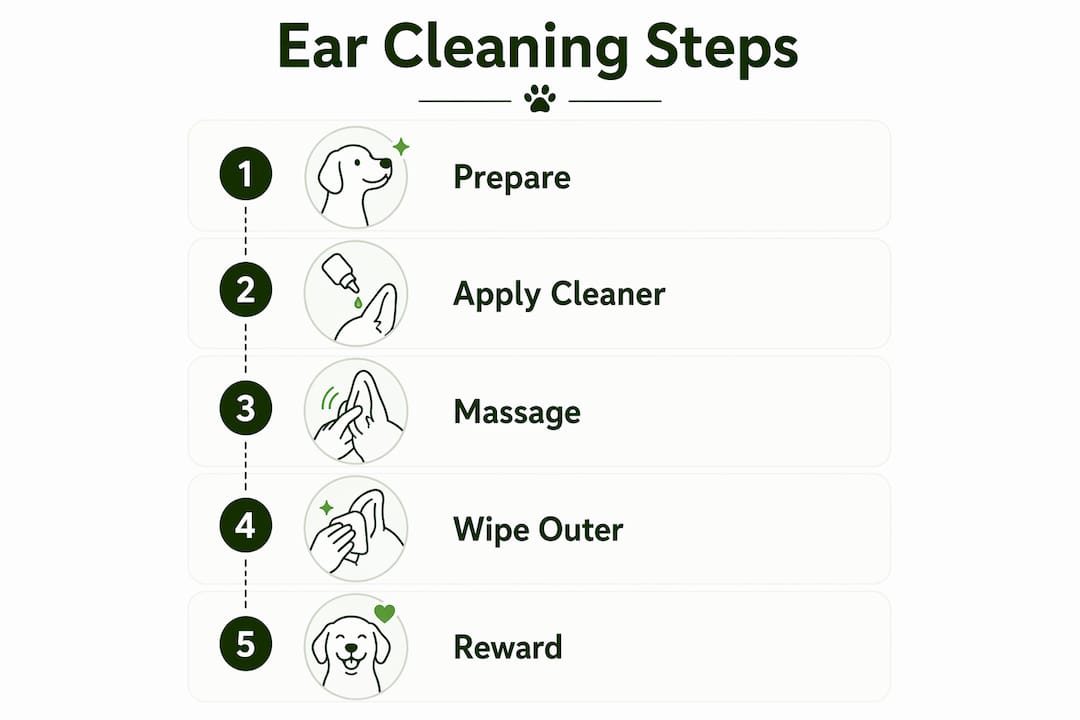
Safe technique matters as much as frequency. Follow these steps in order, and keep your movements slow and deliberate throughout.
- Inspect the ear first. A healthy ear is pale pink, odorless, and free of visible debris. If you see redness, swelling, or dark discharge, stop and contact your vet. Do not clean an infected ear at home.
- Position your dog comfortably. Sit on the floor with your dog between your knees, or have a helper hold the dog steady. Keep your movements calm and your voice low.
- Apply the ear cleaning solution. Hold the bottle tip near the ear canal opening without letting it touch the ear. Squeeze enough solution to fill the canal. Contaminating the bottle tip introduces bacteria into the solution.
- Massage the ear base for 20–30 seconds. Fold the ear flap down and gently massage the base of the ear. You should hear a squishing sound as the solution loosens debris. This step is what actually dislodges the buildup.
- Let your dog shake. Step back and let your dog shake their head. This expels loosened debris and excess solution from the canal. It is messy but necessary.
- Wipe the outer canal with a cotton ball. Insert your finger wrapped in a cotton ball or gauze only as far as your first knuckle depth. Wipe in a circular motion to collect debris. Never probe deeper.
- Repeat on the other ear. Use a fresh cotton ball for the second ear to avoid transferring bacteria.
- Reward immediately. Give your dog a treat and praise right after each ear. This builds a positive association with the routine.
Pro Tip: If your dog resists, break the process into shorter sessions over several days. Clean one ear, reward generously, and stop. Build up to both ears in one session once your dog is comfortable.
The dog’s ear canal curves in an L-shape, which is why cleaning must stay in the outer canal only. Probing inward does not clean more effectively. It risks permanent damage to the eardrum.
What are the signs of a dog ear infection?
Recognizing ear problems early prevents minor irritation from becoming a serious infection. Regular visual checks help you catch issues before they escalate.
Watch for these warning signs:
- Redness or swelling inside the ear flap or canal
- A foul or yeasty odor coming from the ear
- Persistent head shaking or tilting to one side
- Scratching at the ear or rubbing it against furniture
- Yellow, brown, or black discharge
- Dark, crumbly discharge that looks like coffee grounds
That last sign is specific. Dark, crumbly discharge resembling coffee grounds strongly indicates ear mites. Ear mites require veterinary treatment. Cleaning the ear at home will not eliminate mites and may delay the care your dog needs.
Cleaning an infected ear at home can push bacteria deeper into the canal and worsen the condition. Ear infections may require prescription medicated flushes, hair removal around the canal, or oral antibiotics that only a veterinarian can prescribe. If you see any of the signs above, skip the home cleaning and call your vet.
Do not use cotton swabs or harsh chemicals when infection signs are present. The canal is already inflamed, and any additional irritation makes the problem worse.
Common mistakes to avoid during ear care
Most ear cleaning problems come from a handful of repeatable errors. Knowing them in advance keeps your dog safe and the routine effective.
- Cleaning too often. Daily or near-daily cleaning removes the natural oils that protect the ear canal. Stick to the schedule that fits your dog’s breed and lifestyle.
- Using Q-tips or cotton swabs. These push wax and debris deeper into the curved canal instead of removing it.
- Using human products. Products formulated for human ears have a different pH and chemical composition. They irritate dog ear tissue.
- Using cold solution straight from the bottle. Cold liquid causes a startle response that makes dogs associate cleaning with discomfort. Warm the solution first.
- Cleaning too deeply. Going past the first knuckle risks eardrum damage. The outer canal is the only safe zone for home cleaning.
- Skipping positive reinforcement. Dogs who receive no reward during ear cleaning learn to resist or flee. Fear-Free techniques adapted from veterinary practice, including treats before, during, and after the session, build cooperation over time.
- Cleaning when infection signs are present. This is the most dangerous mistake. Always inspect before you clean.
Pro Tip: Keep sessions under five minutes, especially at first. A short, positive session is far more effective than a long, stressful one. Your dog’s tolerance will grow with each calm experience.
Fear-Free handling is not just a veterinary clinic concept. It applies directly at home. Pair every step of the cleaning process with something your dog enjoys, and the routine becomes something they tolerate rather than dread.
Key Takeaways
Consistent, vet-guided ear cleaning prevents the majority of dog ear infections and requires only the right solution, proper technique, and a calm approach.
| Point | Details |
|---|---|
| Clean on the right schedule | Most dogs need monthly cleaning; floppy-eared breeds need every 1–2 weeks. |
| Use only vet-approved products | Avoid hydrogen peroxide, alcohol, and cotton swabs, which cause burns and injury. |
| Massage for 20–30 seconds | Massaging the ear base loosens debris before wiping, making cleaning effective. |
| Stay in the outer canal only | Never go deeper than your first knuckle to protect the eardrum from damage. |
| Stop and call your vet if infection signs appear | Dark discharge, foul odor, or swelling require professional diagnosis, not home cleaning. |
What I’ve learned from years of watching dogs dread ear day
Most dog owners I talk to treat ear cleaning as a chore to get through as fast as possible. That mindset is exactly what makes dogs hate it. Speed creates tension. Tension creates resistance. Resistance turns a two-minute task into a wrestling match.
The owners whose dogs actually cooperate during ear cleaning share one habit: they practice the motions without the solution. They touch the ear, fold the flap, massage the base, and give a treat. They do this on random evenings with no cleaning involved at all. By the time a real cleaning session happens, the dog has already decided that ear handling means good things.
The other thing I’ve noticed is that people underestimate how much the solution temperature matters. A cold squirt into the ear canal is genuinely unpleasant. Warming the bottle changes the dog’s reaction immediately. It is a small step that costs nothing and pays off every single time.
Proper ear care also connects directly to overall health. A dog eating a high-quality diet with good omega fatty acids tends to have healthier skin and ears. Nutrition and grooming are not separate categories. They reinforce each other.
The dogs who end up at the vet with chronic ear infections are almost never the ones whose owners clean too carefully. They are the ones whose owners either skip the routine entirely or clean aggressively with the wrong products. Gentle and consistent beats thorough and occasional every time.
— mostafa
Petbite has what your dog’s ear care routine needs
Ear cleaning works best when it is part of a broader health routine, and Petbite makes that easier for dog owners in Orléans and the surrounding area.
Petbite stocks vet-approved grooming products and high-quality dog food from trusted Canadian brands, all available with free same-day delivery within 3 kilometers of the store. If you want professional help, Petbite’s certified groomers handle ear cleaning as part of their grooming service, with over 500 animals groomed and a 5-star average rating. For dogs who need nutritional support alongside their grooming routine, the PetKind Red Meat Formula is a high-quality wet food option that supports healthy skin and overall condition. Petbite brings the personal touch that larger retailers simply cannot match.
FAQ
How often should I clean my dog’s ears?
Veterinary guidelines recommend once a month for most dogs, every 1–2 weeks for floppy-eared breeds, and immediately after swimming or bathing.
Can I use hydrogen peroxide to clean my dog’s ears?
No. Hydrogen peroxide and alcohol cause chemical burns inside the ear canal and should never be used for dog ear care.
What does dark, crumbly discharge in my dog’s ear mean?
Dark, crumbly discharge resembling coffee grounds is a strong indicator of ear mites. Stop home cleaning and contact your veterinarian for proper diagnosis and treatment.
How deep should I clean inside my dog’s ear?
Clean only as far as your index finger’s first knuckle. Going deeper risks damaging the eardrum and does not improve cleaning results.
What is a natural dog ear cleaner I can use safely?
A vet-approved maintenance cleaner containing lactic or salicylic acid is the safest option for regular home use. Always confirm any product with your veterinarian before using it, especially if your dog has a history of ear problems.